(Bagaimana Mengatasi Masalah Key board Dari "Alien Ware D9T Game)
First of all, turn off the notebook, unplug the AC adapter and remove the battery. Make sure you work in static free environment.
Removing the keyboard from this notebook was easier than I expected.
There are four small latches securing the keyboard, I pointed them with four arrows.
After all four latches are open, lift up the top side of the keyboard.

WARNING! Be very careful with the keyboard cable connector. The connector is soldered to the motherboard and if you accidentally break it, you will have to replace the WHOLE MOTHERBOARD or use the notebook with an external keyboard.
On the picture below you can see the connector in LOCKED state. The white clip opens like a laptop display.
On the next picture you can see the same connector in UNLOCKED state.
Now you can pull the cable from the connector and remove the keyboard.
If you want to replace the keyboard, you’ll have to search for a new one using the part number or model number from the sticker on the bottom side of the original keyboard. You can find cheap keyboards here, More . . .

Why wouldn’t HP make a door for the cooling fan? Why should it be so complicated to replace the cooling fan?
I had two different problems with the laptop.
1. The power jack was damaged. I could have just resoldered the jack but the second problem was more serious.
2. The motherboard couldn’t charge a known good battery. Apparently it had a problem with the battery charging circuit.
So I decided to replace the motherboard.
More . . . .
[Contact]


Before you start, please turn off the laptop, unplug the AC adapter and remove the battery.
Read more . . .
[Contact]
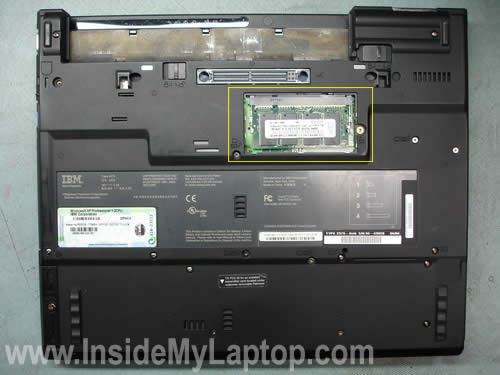
Using this guide you’ll be able to replace or upgrade memory modules (aka RAM) in IBM ThinkPad T40, T40p, T41, T41p, T42, T42p series laptops. In my case I’ll be working with a ThinkPad T41.
This laptop came with 512MB RAM installed. There are two 256MB memory modules installed. One of them can be easily accessed from the bottom of the laptop. The second module is hidden under the keyboard.

This guide explains how to add more RAM memory into a Lenovo ThinkPad T61p series laptop. Are you trying to upgrade laptop memory but cannot find RAM slots on the bottom of the laptop? In this model both slots are hidden under the touch pad. In order to access both memory slots, you’ll have to remove the palm rest.
The palm rest removal procedure could be found in the official ThinkPad Hardware Maintenance Manual. There are three different manuals for laptops with different LCD size. Choose the right one for your laptop. After that go to the “Removing and replacing a FRU” chapter and read instructions for removing the palm rest.
In this guide I explain how to remove and replace the keyboard on an IBM ThinkPad T30 laptop. This guide should work for many other IBM ThinkPad laptops because they all have similar cases.
You can easily remove and replace the keyboard at home without taking your laptop to a repair shop.
First of all, turn off the laptop, unplug the power adapter and remove the battery.

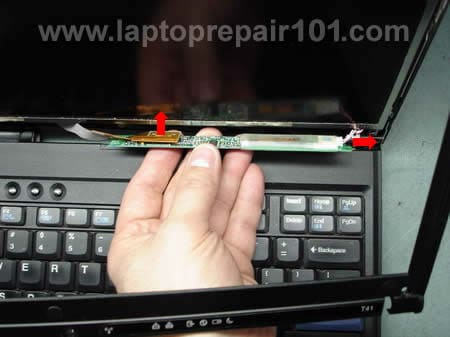
Here are instructions for replacing screen inverter in IBM ThinkPad T40, T40p, T41, T41p, T42, T42p series laptops. All these models are identical and share the same disassembly steps.
What is the screen inverter in a laptop computer? Why would you want to replace the inverter?
The screen inverter is a small circuit board witch is located inside the laptop display panel, you’ll find it below the LCD screen. The screen inverter provides high voltage AC power for the backlight bulb (CCFL) and because of that the image on the screen is bright. If the inverter board fails, the LCD screen remains dark after the laptop is turned on and the image on the screen is very dark, almost invisible. You still should see the image on the screen under a bright light but without backlight the laptop is unusable.

Let’s say you have an IBM ThinkPad laptop and when you turn it on all you get is a black screen with “Fan error” message. What could be wrong?
A few weeks ago, the fan in my trusty IBM T42 bought the farm. This resulted in the unit heating up considerably, as well as numerous “fan error” messages on bootup. It eventually became so bad that to boot up at all, I had to blow compressed air into the fan’s exhaust grill for 5-10 seconds, in order to fool the BIOS and make it believe the fan was actually spinning.
According to the IBM hardware maintenance guide (HMM) for ThinkPad T40, T40p, T41, T41p, T42, T42p this error message indicates a problem with the fan, you can find symptom-to-FRU index on the page58.
The symptom-to-FRU index in this section lists symptoms and errors and their possible causes.
Apparently it’s time to replace the fan assembly. The cooling fan comes together with the heat sink, that’s why you’ll have to replace the whole fan assembly.

Do you want to replace the wireless card on your IBM ThinkPad laptop but not sure where to find it? Pictures posted on this blog explain how to open up an IBM ThinkPad laptop in order to replace the wireless card.
On some ThinkPads the wireless card is located inside the laptop and you’ll have to remove the keyboard with the palm rest if you want to replace the card yourself.
Laptop disassembly and wireless card replacement procedure:

Do you have an IBM ThinkPad laptop with a missing key on the keyboard? Not a problem, you can fix the keyboard without taking your laptop to a repair shop. It’s not even necessary to disassemble the laptop and replace the whole keyboard. If you have all the pieces from the fallen key, then the repair process shouldn’t take a lot of time. These instructions will explain how to assemble the key and install it back on the keyboard.

Is it possible to make an older IBM ThinkPad T41p laptop a little bit faster? Yes, it is if you upgrade the CPU as it explained in this tutorial.
I learned that with a simple BIOS flash, the original 1.7 ghz pentium M “Banias” CPU (130nm process, 1mb L2 cache) that came standard with the T41p can be upgraded to a 2.0 GHz Pentium M 755 “Dothan” CPU (90nm process, 2mb L2 cache) which was available in the later T42 models.

Do you have an older IBM ThinkPad laptop that came without internal wireless card and wireless antennas but has a slot for the wireless card on the bottom? Now you can upgrade your laptop by installing internal wireless card and antennas yourself using these instructions.
In this project we added an internal wireless adapter to a Thinkpad a31. This is possible since it shares the chassis of the Thinkpad A31p which included internal wireless and bluetooth, at the time, cost about $1000 more.
This guide was made for an IBM ThinkPad A31 laptop but should work for some other ThinkPads too.
First of all make sure your laptop has a slot for the wireless card, otherwise installing antennas is absolutely pointless. Usually you can access this slot from the bottom of the laptop. The wireless card slot looks similar to a memory slot.
this projects uses one:
- Dell Truemobile miniPCI 1400
- IBM replacement a31 antenna system

In this guide I will remove the LCD screen and FL inverter board from an Acer Aspire 3620. The guide will work for other Acer Aspire models. If it works for your, please mention the model number in the comments below.
You’ll find my first disassembly guide for the same Acer Aspire 3620 in the previous post where I explained how to remove the motherboard and clean the cooling module.
Let’s start taking it apart.

In this guide I’ll be cleaning the cooling module in an Acer Aspire 3620 laptop. Most likely my instructions will work for some other Acer Aspire models. Fell free to leave a comment and mention the laptop model if it works for you.
This particular laptop was shutting down by itself while running some intensive applications. I found that the cooling module (heat sink and fan) is completely clogged with dust and needs a good cleaning. Unfortunately, in this model the cooling module is buried deep inside the laptop and it’s necessary to take the whole thing apart in order to access it. OK, let’s start.
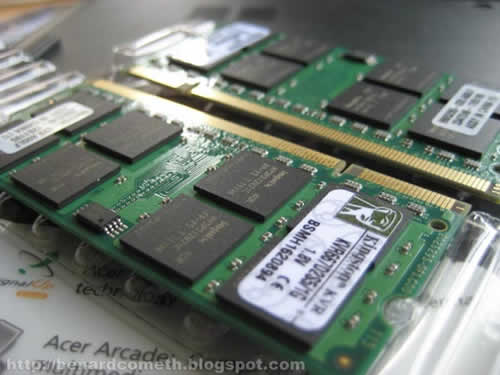
This guide explains how to replace or upgrade memory modules in Acer Aspire 5500 series laptop. Thanks to benardcometh.blogspot.com
Fortunately, both memory modules can be easily accessed through the bottom of the laptop. It makes the memory upgrade a five minute procedure.
In this tutorial I’ll explain how to remove LCD screen and replace inverter board in an Acer Aspire 5100 laptop. This tutorial will work for many other Acer laptops with the same body.
In my previous article I was taking an Acer Aspire 5100 apart.
OK, let’s get inside the display assembly.
First of all, turn off the laptop, unplug AC adapter and remove the battery.

The screen bezel has four screws hidden under for seals. Two rubber seals on the top of the bezel and two plastic seals on the bottom.

In this guide I’ll explain how to take apart an Acer Aspire 5100 laptop. I’ll show how to remove and replace major laptop components such as CD/DVD drive, memory, hard drive, wireless card, cooling fan and keyboard.
In the next article I’ll explain how to remove LCD screen and replace inverter board.
First of all, make sure the laptop is turned off, the power adapter is disconnected and the battery is removed.
Both memory modules, wireless card, cooling and and hard drive can be accessed from the bottom. Remove four screws marked with red circles and loosen two screws marked with green circles. Remove both covers.
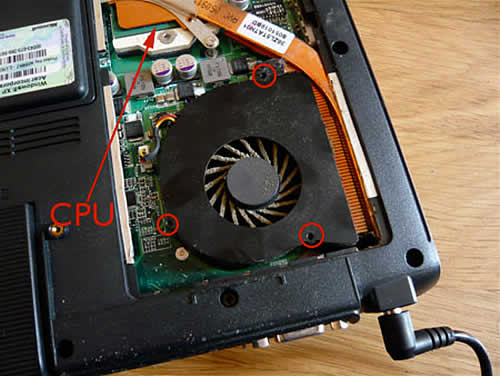
This guide explains how to access and clean the cooling fan in an Acer Aspire 3003LM laptop. Most likely this guide will work for many other Aspire laptops.
Does your laptop shut down without any reason? Does it feel hot on the bottom? Does the cooling fan work all the time and it’s very loud? If you answer yes on all three questions, most likely your laptop experience overheating.

This tutorial will help to install an internal Bluetooth v2.0 adapter into your Acer Extensa 5420 notebook. I think this tutorial might work for Extensa 5620 notebook series too, but I’m not 100% sure.
For this upgrade you’ll need a compatible 4-pin internal Bluetooth adapter, you can find it here. Make sure to contact the seller and confirm that you are getting a compatible adapter.
The Bluetooth connector is located on the motherboard under the touchpad and the author explains how to install the Bluetooth adapter without taking the whole thing apart.
The following instructions will explain how to replace the hard drive and the DVD drive in an Acer Aspire 3610 laptop. I’m not familiar with Acer laptops but these instructions could be the same for other Aspire 3600 series laptops, such as Aspire 3610, 3620, 3630, 3640, 3660, 3680.
1. Hard drive replacement instructions here

The hard drive can be easily accessed from the bottom of the laptop. Simply remove the hard drive door, remove four screws securing the hard drive caddy, disconnect the hard drive from the connector on the motherboard and remove it from the laptop.
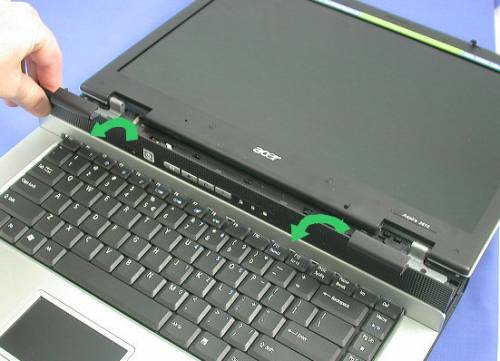
The following instructions will help you to replace the keyboard on Acer Aspire 3600 series laptops. The disassembly steps should work for Acer Aspire 3610, 3620, 3630, 3640, 3660 and 3680 laptops.
Replacing the keyboard on your Acer Aspire 3610 laptop is not as difficult as it may sound. Make sure your computer is unplugged from any power source, then remove the battery.
The whole keyboard replacement process shouldn’t take more then 10 minutes.
1. You can find a new replacement keyboard for less then $25 here.
2. Follow these instructions to remove and replace the keyboard.

You will find instructions for replacing or upgrading RAM (memory) in an Acer Ferrari 3400LMi laptop in this page. Just scroll down to the entry number 17.
This laptop has two memory slots. One of the memory slots can be easily accessed through the door on the bottom of the laptop. The second memory slot is hidden under the keyboard and you’ll have to remove the keyboard in order to get to it.
Will Be Continue . . . . . . . ....


 Open all
 ClosedAll
0 komentar:
Posting Komentar